Tuesday, November 19, 2013

4 Seasons Quilt

How long have you known the friend you've the longest?  For me, it's been over 30 years!  We met in first grade.  We've been through ups and downs, we've gone years without talking - simply because life got in the way.  Somehow - no matter how long it had been - we always find our way back to each other.

I had a milestone birthday this year and she flew out to surprise me.  It had been 10 years since we last saw each other.  People that know me wouldn't usually use the word speechless.  I like to talk!  Well, I couldn't put together a coherent sentence for about an hour after she walked through my front door. 

Since I couldn't fly out for her milestone birthday, I wanted to do something that I hope is equally as special - though not nearly as fun.  :)  She loves trees, and her favorite story is "The Giving Tree" by Shel Silverstein, so I set out on a mission to design and make a tree quilt.  I decided on having a tree for each season.
Art quilts are one of my favorite projects, and this turned out better than I could have hoped when I started.  The back is a soft flannel.  I added an iron on label that I traced with pigma inks and colored with crayon, then heat set.  

Love you my friend - Happy Birthday!


Monday, August 26, 2013

Catnip laced nap mats

Our cat Louie loved catnip, and we'd always spread it around, but then it made a mess I'd have to clean up later.  The mats keep all the catnip contained, and the kitties roll around (and sometimes into) the mat.  A little later and they are happily snoozing, still on the mat.  I wish I was making these when Louie was still alive... but there are plenty of lucky cats across the West that are very happy with me and their owners. 

~ Enjoy ~

p.s. - I sell the mats on Etsy, you can get to my store through the link on the left!

The Purple Quilt

I am so excited to give this lap blanket to my nieces for Christmas this year.  I LOVE purple, so making this for someone else was hard .... but as they say 'if you love something set it free'.  And oh my gosh, it even has bling

They are both young ladies, but I didn't want to make them something in their age range because I don't want them to grow out of it in a few years.  I want it to be a blanket they can cherish forever (as long as they continue to like purple).  :)

For the first time ever, I pieced the back.  That was fun and much easier than I thought it would be.  I don't know why I was hesitating for so long.  There is a mix of stitch in the ditch and free motion quilting.  Also - I used continuous binding for the first time on this quilt.  The bling is a series of 3 crystals every six inches set on the outer border.  The quilt measures 42x42.  It's quite a treasure to me - I hope Emily and April love it as much as I do.

Sunday, August 25, 2013

Merry Merry Snowman Blocks 7, 8, 9

I know I've been bad about posting recently, but I didn't realize I failed to post my finished Merry, Merry Snowman blocks.  I have finished all the blocks!!!  I also recently added both borders so now it's ready to sandwich and quilt!

My mission - find a backing.  At first I was sure I would do a red flannel.  The more thought I put into it, I realized I probably wouldn't be using the blanket a lot.  It will come out after Thanksgiving and be more of a decoration with occasional use.  I put so much work into I don't want to be washing it repeatedly every season.  I've settled on a fabric backing.  Now I just need to decide if I'm going to get a matching solid and add some leftover pieces from the top or pick one of the fabrics in the top to be the back.  Decisions, decisions!

This will probably take quite a bit of time to quilt.  My plan is to stitch in the ditch around each block, then go back and free motion stitch around all the applique.   It will be my biggest challenge in machine quilting so far.

Friday, August 23, 2013

Continuous Binding

One of the things that really bug me with traditional binding (making a pocket for the ends) is that it's bulky where the ends meet up, and the binding strip is a little loose inside the pocket.  Every time I look at a project I can always easily spot the start/end of the binding.  A few months ago, I saw a tutorial for continuous binding (no pocket method) and wanted to try it.

I just finished a blanket (pictures coming soon) so I figured this would be a good time to go for broke.  I had been dragging my feet on doing the binding because I was a little nervous about messing this up.... but, to my surprise - it's EASY!!  It worked perfectly!!  I'm so excited and I don't think I'll ever go back to the pocket method again!

I can't find the video I originally saw/used, but this tutorial is really good and will get you started on continuous binding as well!

~ Enjoy ~

p.s. - those little tree quilts are ADORABLE!  I want to make some.  :)

Monday, August 5, 2013

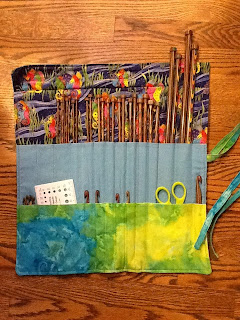
Knitting Needle Case


Knitting Needle Case
A dear friend of mine is amazing with needles.  She knits and crochets turning out beautiful, wearable art.  For her birthday she received a entire set of gorgeous wooden needles.  In order to protect them she wanted a case.  When she asked me to make it for her I was so honored, and excited to get going on the project. 

Renee sent me a few ideas for cases she found online, and gave me some stunning seahorse fabric to use.  Having never made one before, I chose a tutorial, made a prototype out of scrap fabric, and jotted down notes on how I would do it different.  We met for lunch so she could see it before I cut into the good fabric, and she loved it.  YAY! 

Knitting Needle CaseIt was a bit nerve wracking making the first cut - I didn't want to make any mistakes and waste any of the seahorse fabric.  But, all went well and the finished project turned out beautifully!

Thanks Renee for letting me make this for you, for giving me projects that challenge my skills and knowledge, and for letting me use your photo of the case all filled up.  :)

~ Enjoy ~

Turning Tip


So recently I was making a narrow tie, and needed to turn it right side out.  I don't have any wire hangers, so I went in search for something that would fit.  I ended up browsing through closets and drawers all over the house and came up with a Q-Tip.  Sounds strange, but worked so good!  I just pulled the cotton tip off each end... in that regard clean lollipop sticks would work too, but I don't have any of those.  Next time you're in a pinch with a sewing project, you just might find what you need in the hall closet!

Sunday, July 28, 2013

Camping: S'mores

You're probably thinking, any fool knows how to make s'mores ... why would someone post on a blog about it?  Just wait, you're gonna love this!  I use Ghirardelli Squares to make my s'mores.  They are the perfect size to fit on the graham and they come in all kinds of flavors!  Now - aren't you glad I posted about something as simple as s'mores?  Try your favorite flavor the next time you enjoy sitting by the fire....

Grilled Zucchini Panini

It's summertime again, and the garden is in full swing. 

I don't know if this is technically a Panini, but gosh it's just so fun to say, try it... Zucchini Panini.

Ok, so it's almost embarrassing how simple this is.  Split a torta roll (Costco) in half, drizzle with olive oil.  Drizzle both sides of the zucchini slices with olive oil, then top with salt and pepper.  Place both pieces of the torta roll cut side down on a grill.  Lightly brown/toast the bread, remove and put a slice of Havarti on each piece of bread.  Grill both sides of the zucchini, place on the bread, put the sandwich on the grill for minute or two to heat through.  

What a wonderful seasonal treat.  This would make a great pairing with salad or soup.  If I had some fresh pesto or a good pepper jelly I might have added one of those.... what would you add?

~ Enjoy ~

Sunday, June 23, 2013

Log Cabin Tote Bag

Log Cabin Tote Bag
More and more I find myself trying to come up with homemade gift ideas for birthdays and special occasions.  Now that I'm getting more confidence in my sewing skills and willing to try new things, it's a little easier.  I have a friend that knits and I really enjoy all the things she has made for me, so I know homemade stuff makes a great gift.

One of the teachers I've supported the last 2 years just had a milestone birthday so I decided to make her a tote bag.  What girl doesn't like a good selection of bags??  I used beautiful batik fabrics - they make everything look richer and deeper with their wonderful colors and patterns.  I followed a pattern from AllPeopleQuilt.com.

Log Cabin Tote Bag embellishments
I love having sewing gal pals to bounce ideas off of.  Deanna helped me pick the fabric colors, and Dionne and Judi gave me the button closure idea.  The pattern doesn't call for a closure so it had to be done after the fact.  I made a skinny strip of fabric and since it couldn't be installed between the lining and bag without taking it apart, I tied the ends and put beads on so it would look like a decorative addition.  I used 2 different colored beads because of the two tone log cabin.  Since I haven't met a girl yet that doesn't like a little bling, I added the jewels along the bottom edge of the blue as well.  I think it really finished the bag off and made a big difference in the final outcome.

Log Cabin Tote Bag embellishments
I have a confession to make: every time I walked by the bag I couldn't help but admire it.  It was probably the sparkles... they make everything better!

I was going to put homemade cookies in the bag, but ran out of time to bake them.  I put my favorite historical fiction novel in, "Hotel on the Corner of Bitter and Sweet".  A friend from England said whenever they gift a bag or purse they always put a coin in for good luck.  I found one from her birth year and added that too.

Happy Birthday Nicole!

~ Enjoy ~