Tuesday, August 28, 2012

Shower Curtain 'Runner'

We have a cowboy theme going through most of our house, so when I see cowboy fabrics, I usually buy some knowing I can find a use for it somewhere!  I've been in a house sprucing/cleaning/decorating kick the last week or so (which you'll soon see when I post about my new sewing room!).  Since this is fabric I've really been wanting to use, and the bathroom needed a pop, I went for it.  Wow, it made a huge difference!  Now I think I'll need to get some different color towels to finish the look.

Before adding the runner
 
runner for the shower curtain to decorate it
After adding the runner
 
close up of the cowboy fabric for the shower curtain runner
Close up of the fabric
 
To make this: cut a strip of your favorite coordinating fabric.  Seam it together, if necessary, to make it long enough. Starch and press.  Overlap the sides a bit to make sure it's long enough once you have stitched it on.  Press a 1/4" seam on the top and bottom of the strip.  Lay it on the shower curtain, make sure it's straight.  Find spots where you can stitch throughout to keep it tacked down in various places.  Once all stitching has been done inside, trim the left and right edges and press a 1/2" hem to the sides of the shower curtain.  Pin, then sew the top and bottom edge finishing with each side.  You may want to periodically smooth out and re-pin the runner as you go through the steps so you don't get any puckering.  Hope this made sense, let me know if you need any clarification.  :)
 
~Enjoy~

Sunday, August 26, 2012

Nursing Cover

nursing cover made with soft flannelSince the Bunny for Baby quilt was a gift to Rayma from my Mom, I wanted to send along a little something as well, from me.  I was inspired by these nursing covers as gifts when I saw a friend of mine had made one as a gift, and I loved it!  Her sister told her they are really nice to have and kind of expensive to buy.  That's all it took, I went to the store and got the pattern right away. 

I made this out of warm, snuggly flannel.  The strap is adjustable with D-rings, there is a pocket on the inside and there is boning along the neck area to keep it off the chest so mom can look in at baby easier.  It went together pretty quick. 

Anyone else want one??


nursing cover features a pocket insidenursing cover has boning along the top

Thursday, August 23, 2012

Bunny for Baby - Quilt #6

baby quilt with applique bunny and flowerMy first commissioned quilt!  Ok, so the job came from my Mom, but it gave me good practice in turning someone else's vision into reality.  Fortunately she was very open to my thoughts and gave me a lot of creative freedom. 

Rayma recently had her first baby.  Her family and my family have been friends for so long, I call Rayma's mom auntie.  We all live in different states, and haven't seen each other in many years, but my mom is still very close with all of Rayma's family.  Mom wanted a special and unique gift that Rayma and Harper could treasure forever. 

The blanket measures approximately 30" x 40".  It includes applique, hand embroidery, and machine quilting.  This was my first time machine quilting anything other than stitch in the ditch.  My machine doesn't do it well, but I made it work.  :)

To make this quilt: baby blanket with applique flower and hand embroidered name
  • Cut six 10.5" x 10.5" squares, cut one 30.5" x 20.5" rectangle for the center.  Sew two strips of three squares each.  Attach one strip on either side of the rectangle.
  • Find a bunny and flower applique drawing (I like Google images), choose your fabrics then trace and applique.  Attach baby rick rack.
  • Use a button for the bunny nose and hand embroider the mouth and whiskers.  The eyes are a 6 strand french knot.  Hand embroider the baby name and birthdate onto the flower applique.  (I typed it on the computer to give me a font so I wouldn't have to rely on my handwriting, then traced it.)
  • Make your quilt sandwich, stitch around the bunny, stitch in the ditch on each of the squares at top and bottom.
  • Go to Google images and find different flower drawings. Print them on card stock, cut out and use as a template to draw the flowers (using disppearing ink) onto the blanket. Machine (or hand) quilt.
You will need:
3 fabrics for the top and bottom squares
1 fabric for the center rectangle
Fabrics for the bunny, flower and leaf
Fabrics for the backing and binding (I used the bunny fabric as backing and binding - it was perfect, and we had a lot of it)
Batting
Button
Matching DMC embroidery floss
Matching thread colors for quilting

The quilt top goes together pretty quick since it's six larger pieces.... everything else takes more time.  It was a labor of love and I really enjoyed watching this one come together!

~ Enjoy ~

Monday, August 20, 2012

F... CANCER - Quilt #7

fuck cancer quilt made for a friend with hodgkins lymphomaCancer sucks!  A friend was recently diagnosed with Hodgkins Lymphoma.  He's had lymph nodes removed, had his lungs drained of fluid a few times already, and is now going through chemo.  Hearing of his diagnosis really hit us hard.  Being thousands of miles away, there isn't much we can do for the family.  Even though it's very hot where he lives right now - everytime I see a picture of him in the hospital I think, 'he needs to have a custom blanket', because that is something I can do to let him, and his family, know that we are thinking of him.  So, the search for fabric began.

My husband (Daryl) even got interested in this blanket so we made it a collaborative project.  He made suggestions for fabrics and had veto rights for the stuff I picked out.  Our friend has participated in many Ironman races, both half and full.  His favorite part of the race is biking.  He loves watching sports, he's a chef and he loves his wine.  I scoured the internet and every quilt/fabric store I went into to find a bunch of fabrics I could use for a mash up quilt.

fuck cancer quilt with livestrong hand embroideryIn case my friend, or any of you out there reading, are wondering my thoughts behind the fabrics: here we go. In addition to the interests listed above, I found out his favorite colors are yellow and black because of Lance Armstrong's LIVESTRONG Cancer Charity.  Those fabrics (with LIVESTRONG hand embroidered on them) speak for themselves.  Since an Ironman consists of a bike race, swim race and running race I found fabrics representing each (there were slim pickin's though - thank goodness for the Summer Olympics the stores had sports fabrics in stock).  Then there's the food, chef and wine fabrics.  My favorite find was the print of chef's on bikes with wine and/or bread.  I wanted the blanket to be full of everything that my friend enjoys.  I wanted him to see something new or have it look different everytime he uses it. 

fuck cancer quilt features fabrics representing what the recipient likesOnce all the fabrics were picked out, I brought my friend Dionne into the collaboration.  I needed something that would go together fairly quick because I didn't want it to be a month before I could send this off.  I shared with her Daryl's thoughts on how he wanted the fabrics to go together and we formulated a plan based on a scrappy quilt.  Scrappy quilts are generally small strips sewn together in order to reduce the size of our scrap fabric pile.  I wanted the blanket to be about the size of my couch snuggler, which is 42" x 60", and since we wanted to see enough of each fabric pattern, we decided on the finished strips at 4" x 9".  Since I was staggering each row I'd also need some 4" x 5" pieces to fill in on the ends. 

I found that doing hand embroidery in the car on a long trip really helped to pass the time.  When I got home, I also discovered my writing isn't very good when trying to stitch in a moving vehicle.  In addition to the LIVESTRONG hand embroidery, I added 140.6 in a few places - which is the number of miles in a full Ironman race.  There's one little secret message to cancer inconspicuosly stitched into the blanket.  Since it contains a bad word (hint: look at the title of this post) I won't repeat it here.  I wonder when my friend will find it.  :)

I heard from a friend who's mother had Hodgkins Lymphoma that she was always cold and her skin was very sensitive from the chemo treatments.  So, keeping that in mind I used a soft, cuddly flannel for the back.

To make this blanket:
Cut
(68)  4.5" x 9.5" strips
(7)    4.5" x 5" strips
Backing and batting: at least 46" x 66"  (You want a couple inches on all sides)
Stitch
(5) pieces into a strip 8 times
(4) pieces into a strip 7 times
the 4.5" x 5" pieces onto each end of the 4 piece strip so it's the same length as the 5 piece strip
All the rows together
Finishing
Create your quilt sandwich of quilt top, batting and backing.  Baste.  Stitch in the ditch following the quilting width instructions of the batting you are using
Bind

Get well soon Rob!  We love you!

~ Enjoy ~

p.s. - for anyone wondering about the post for quilt #6, you haven't missed it - I can't post that for another week or two.  I need to wait until the recipient has seen the blanket first.  But - it's a cute one, and I can't wait to share it with you!

Sunday, August 19, 2012

Corn Pico de Gallo

roasted corn, bell pepper, jalapeno, garlic, cilantro, lime, red onionIt's that time of year - in late summer/early fall fresh sweet corn starts making an appearance at the farmer's markets.  There is simply no better way to cook it than roasting it on the grill.  One of my favorite ways to use fresh corn (other than slathering with butter and eating it right off the cob) is to make a pico.  It's not the pico we commonly know, but the ingredients are pretty much the same except I use roasted sweet corn instead of tomato.  We use this pico to top our tacos and fajitas... and it's even good on a chip!

To roast corn: Soak corn (with husks and silks intact) in salted water for as long as possible, but no less than 1 hour.  We started soaking the corn this morning.  Grill on high heat for approx 20-30 minutes until the husks are dark brown or blackened on all sides, turning every 8-10 minutes.  Remove from heat, let sit about 10 minutes, remove husks and silks, let sit until cool enough to handle.

roasted corn, bell pepper, jalapeno, garlic, cilantro, lime, red onionI don't have a recipe with measurements, so I will describe the amounts I used today, but you'll want to adjust to taste and preferences.  We like garlic and spice, you may want to use less and add more as needed.

6 ears corn, roasted
1 red bell pepper
6 cloves garlic, very finely minced
1/3 large red onion, diced
3 jalapeno, diced
1/2 bunch of cilantro, chopped
juice and zest of one lime
salt and pepper to taste

Cut corn off the cob and place in a large mixing bowl.  Add the rest of the ingredients and mix well.  Taste with tortilla chips and make adjustments as necessary.

** Be careful when handling jalapeno or any hot pepper.  Even after washing your hands numerous times, the capsacin (the stuff that makes peppers hot) will still be on your hands.  Use gloves if your skin is sensitive or if you wear contacts.


~ Enjoy ~

Saturday, August 18, 2012

Camping Meal: Bagel Breakfast Sandwiches

bagel sandwich for breakfast while camping
One of my favorite breakfast meals is a fried egg sandwich.  Toast some whole wheat bread, fry up a few farm fresh eggs (break the yolk) topped with salt and pepper, lightly melt a slice of cheddar over the eggs - oh yeah................... Ok, I'm back.

My husband doesn't like fried eggs, so I've modified the fried egg sandwich for a camping breakfast, and it's still scrumptious!  We enjoyed this tasty treat during our recent two week adventure to Glacier National Park, Idaho, Southeastern WA and Central Cascades.

4 slices bacon
2 bagel thins, lightly buttered on the inside
4 eggs
Dollop of heavy cream (or 1/2 and 1/2)
salt and pepper
2 slices cheddar

Heat a grill with a cast iron griddle on top, cook bacon.  While bacon is cooking, scramble the eggs with cream, salt and pepper then pour into a heated, oiled skillet.  As eggs start to set, lift edges and tip the skillet so the egg on top fills in.  Continue doing this until most of the egg is set.  Cut in half, then fold in half so you have a piece that fits onto each bagel, continue cooking over low - medium heat until egg is cooked inside and set.  Turn off the heat and place a slice of cheddar over the top of each egg piece.  When bacon has finished cooking, drain on a paper towel, remove the griddle and toast the bagel, top first so the butter on the inside melts into the bagel, then turn and toast the insides.  Assemble your breakfast bagel sandwich and eat outside by the campfire!

Another variation we came up with was the breakfast grilled cheese:
Prepare the eggs the same way as above;
Have the bacon already made and the griddle cleaned off;
Set up a traditional grilled cheese sandwich, but add the egg and bacon
 
Oh, and another thing I added was some crumbled fresh goat cheese to the eggs just before they were finished cooking (that's what the white spots are).
breakfast grilled cheese with egg and bacon

~ Enjoy ~

Sunday, August 5, 2012

Blueberry Lemonade

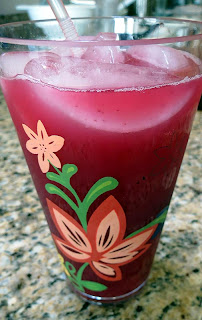
blueberry lemonade with vodkaIt's hot here today ... again.  Ok, just had to get my little whine in.  :)  The blueberry gods have been very good to me this year.  I've pulled about 8 pounds off the plants so far, and there's still plenty more out there.  Every other year I get just enough to eat them all.  This year not only have I put some in the freezer, but I'm looking for ways to use them.  With the weather at 100 degrees, blueberry lemonade sounded very refreshing... and it was!

I used Simply Lemonade because I didn't have enough fresh lemons to make some from scratch.


You will need:
Lemonade, fresh or bottled (but please don't use Minute Maid)
1 cup fresh blueberries
1 tablespoon sugar
Splash of vodka

Puree blueberries in a blender, strain through a mesh strainer to remove skin and seeds into 2 tall glasses.  Fill glass the rest of the way with lemonade and ice (and another splash of vodka if you're so inclined). 

If I had it, I would have garnished with mint (maybe even muddled a little into the cup too)!

~ Enjoy ~

P.S. - I love strawberry lemonade .... but the blueberry version is better.  My husband doesn't eat blueberry anything, and he liked it!

Saturday, August 4, 2012

Pasta and Garden Veggies

fresh pasta, zucchini, peas, pine nuts
It's hot here today, I mean like in the upper 90's, and I just don't do heat well.  That's why I moved to the Pacific Northwest from Arizona.  Fortunately you only have to hear me whine about this a couple times per year. 

Earlier today I thought about grilling steaks or burgers - but then got lazy and didn't want to run out to the store.  I'm glad I didn't, there's no way I would have been happy cooking outside!  So what do I decide on instead?  Making a holy mess of the kitchen, using every burner on the stovetop and dirtying what seemed like every pot, pan and utensil I own.  But it was worth it........

I haven't made pasta in awhile, and I've been thinking about the wonderful taste and texture of it lately.  I was going to make a quick marinara to top it with, but my husband said I should just toss it with olive oil and fresh veggies.  Ohhhh, good suggestion!  There's some zucchini and peas in the garden ready for picking!  But, I can't stop there.  I had to make it even more complicated than marinara would have been.  But it was worth it........

This is similar to the Bowl-O-Pasta I posted about in May, but here's what I did tonight:

fresh pasta, zucchini, peasMade the pasta dough, let it rest about 10 minutes, then used the pasta machine to flatten it to sheets and cut it into spaghetti.  While the pasta was hanging to dry for a bit, I got all of my ingredients ready for cooking.

The end result was a fantastically delicious pasta bowl with garlic and crushed red pepper infused olive oil*, fresh peas, pancetta, grilled zucchini, topped with pine nuts and fresh grated parmesan.  I finished with a drizzle of extra virgin olive oil.  In the words of Cisco Morris - oh, la, la!  My only wish is that the cherry tomatoes were ready too .......

~ Enjoy ~


* To make garlic and crushed red pepper infused olive oil: put some olive oil in a skillet, add a few sliced cloves of garlic, and crushed red pepper.  Gently warm the oil until you can start to smell the aroma of garlic, then turn off the heat.  Let sit about 10 minutes.