Showing posts with label quilt. Show all posts

Monday, August 26, 2013

The Purple Quilt

I am so excited to give this lap blanket to my nieces for Christmas this year.  I LOVE purple, so making this for someone else was hard .... but as they say 'if you love something set it free'.  And oh my gosh, it even has bling

They are both young ladies, but I didn't want to make them something in their age range because I don't want them to grow out of it in a few years.  I want it to be a blanket they can cherish forever (as long as they continue to like purple).  :)

For the first time ever, I pieced the back.  That was fun and much easier than I thought it would be.  I don't know why I was hesitating for so long.  There is a mix of stitch in the ditch and free motion quilting.  Also - I used continuous binding for the first time on this quilt.  The bling is a series of 3 crystals every six inches set on the outer border.  The quilt measures 42x42.  It's quite a treasure to me - I hope Emily and April love it as much as I do.

Tuesday, February 12, 2013

Forever Flowers - Wall Hanging #2

Flower pot wall hangingSome of you know that in December a co-worker of mine passed away.  It was sudden, shocking, and so very sad.  Brian was an amazing man, loved by so many people.  For his services they needed to use the high school gym and hundreds of people attended.  He was the office manager, and while at work he suffered a brain aneurism while talking with one of the secretaries.  She has sinced moved into his job and office.  I can't even begin to understand what a difficult decision it was for her.  I know when I walk down the hall I'm still adjusting from expecting to see his smiling face.  I wanted to do something for Tracy to help her personalize the space and celebrate her promotion. 

Close up of flowersWhen I stepped into the sewing room to start picking out a design and fabrics this isn't what I had in mind.  I didn't have any specific ideas, but it wasn't this.  I'm so happy with the end result and I hope she will be to.  I just love the creative process, even if I still don't fully understand it.  :)

Close up of vaseThe wall hanging measures 16" x 16".  It's a 12" x 12" muslin center, a 1" (finished) inner border with corner stones, and a 3" (finished) outer border.  The flowers and vase are appliqued on, I added a strip on the vase and attached heart button embellishments.  I embellished the flower petals with crayon to add some color and placed a swarovski crystal in the centers.

Flower embellishmentsFor the quilting I started off intending to do a cross hatch, but finished the first direction and liked it so much I stopped there.  When I attached the binding I added a strip of ribbon for hanging.  When I held it up, the small quilt would bow a little ... but once hung against a wall it laid flat and proper.  Daryl suggested I add a zip tie inside the binding just where the ribbon is to give it a little rigidity just to be sure it wouldn't go wonky at some point.  Worked like a charm!

 ~ Enjoy ~

Monday, December 31, 2012

Calla Lily Quilt #10

Calla Lily Quilt I made for my Mom at ChristmasHere's what I made my Mom for Christmas.  I tried to incorporate the colors of her house (purple/salmon/beige) plus her favorite color (blue) as well as her favorite thing (flowers) all into one blanket.  It measures out at 41 x 61. 

The calla lilies and vase are made mostly of various batik fabrics.  I appliqued using Wonder Under fusible webbing and a blanket stitch.  I used matching thread colors so the item would pop and not the stitching. 

The 'outside' of the flowers are a Kona solid that matched.  I had a scrap green batik that made perfect stems; it came in a bag of random fabrics a friend gave me.  Hard to see in the picture but it has a terrific blend of colors.  I don't have a lot of it left so I'm saving it in case I want to make more stems or leaves.  I'll have to keep my eyes open for another green similar to it.  The vase is a perfect purple batik and I used a solid purple Kona to simulate the 'inside' of the vase on that top edge.  I quilted a line across that bottom part of the vase to simulate a base to finish it off.

Calla Lily quilt for my mom at ChristmasI was browsing clip art images of flowers to get ideas and came across this image.  It was so perfect, I sized it and printed it then used that as my applique pattern.

I didn't follow a pattern; this is an original design.  I was inspired by a pattern I saw in a batik quilting book that was a wall hanging with big leaves over 2 panels.  The top design took on a few changes as I went along, and at one point I had the whole top put together then posted a picture on my favorite forum Quilting Board for advice on how to quilt it.  One of the members suggested I add a thinner black strip at the top and gave me a visual.  I agreed that it did look better so I took the top apart and added it. 

Custom quilting of calla lilies and leavesThis was my first time doing echoing, crosshatching and adding a specific free motion design. Because of this I used thread that matched the color of the fabric, so if I goofed it wouldn't show as much. In the panel next to the vase I did free motion calla lilies and leaves. I don't think I'll do this much quilting on a project this size with my machine again. It was very frustrating with a 4.5" throat. 

Calla lily pillow to match the blanketBack of the cally lily pillow I made a throw pillow out of the same fabrics with a smaller version of the calla lily to go with the blanket.  Since we were driving to Arizona for Christmas I could add this to her gift.  I finished the pillow leaving a hole in the bottom end, wrapped it, and packed a needle and matching thread.  The day after Christmas we bought the stuffing and finished it up completing the set.

Tuesday, December 25, 2012

Home Tweet Home - Quilt #9

I have a lot of posts to write, so pardon them being a bit quick and dry.  This project followed the "Little Flyer" quilt pattern by Alex Anderson.  I must say, after finishing the piecing I decided I wouldn't make this one again.  There's a lot of little pieces!  And with all these little pieces it's very hard to get the points and rows to line up.  The center of the quilt follows the pattern, but I changed the border sizes and added an extra border.

This lap quilt measures 44" x 44" and it's a Christmas gift for Daryl's Mom and Dad.  I made them some placemats out of the blue background birdhouse fabric awhile ago.  I backed the quilt with flannel for snuggly warmth during the cold Wisconsin winters. 

Recently I saw a post on the Quilting Board about intentionally using the wrong side of a fabric.  I'm a little bit of a perfectionist, OCD personality so I had never thought about doing this.  A few days after reading that post, I was putting the borders on this quilt.  As I was pinning the 1" middle border for stitching (right sides together), I saw that the wrong side of the fabric actually looked better with the rest of the fabrics.  The right side was quite a bit darker... so I unpinned it and used the wrong side.  I felt a bit ..... naughty, scandalous, excited - I don't know the words I'm looking for.  I felt free. Free from the 'inside of the box'.  I felt like I had stepped outside the box.  It might be a baby step, but it's a start!

~ Enjoy ~

Sunday, October 14, 2012

Green Bay Packers - Quilt #9


Daryl LOVES the Green Bay Packers.  He grew up in Wisconsin, moved away 15 years ago and still maintains his allegiance to the team.  During football season a glass Packers dish decorates the mantle, and every time the Packers play he wears the same Packers shirt and green/yellow camo pants.  When the Packers went to the Superbowl, our house was decked out in decorations and we served up cheesy food representative of Wisconsin.  Even one of the dogs got dressed up!!  We had an extra TV in the kitchen along with the one in living room so no one would miss a minute of the game. 

This year we agreed not to get each other gifts for our 12 year wedding anniversary.  So, I made him one instead.  I started looking at the internet for ideas on a football themed blanket.  I didn't find any one blanket that really charmed me, so I pulled things I liked from many blankets and created my own pattern.  I was very surprised that there aren't many templates out there for sports related items. There's one out of print book I could find. I scoured both book sections of Joann's hoping to find one, combed through Amazon.com...  so for the applique I used a combination of Google images and I downloaded a free trial version of Adobe Illustrator. 

Normally I agonize over fabric choices when I'm looking to buy for a new project.  This time, I went in Joann and had everything picked out within 30 minutes.  I wasn't crazy about the fabric for the green border and 'field', so I went to Aunt Mary's Quilt Shop in Smokey Point (Arlington, WA) and found ones that were absolutely perfect.  Now I had everything I needed!

I started by washing and starching/pressing my fabrics.  This step takes a lot of time, especially when I have so many different fabrics, and a few were large pieces.  It's worth it to me though, I prefer working with washed/starched fabric.  Then I put the top together, which was pretty quick.  Now it was time for the applique.  I love doing applique - I think it adds so much character to a project.  I wanted to try using a satin stitch around the applique (I usually use an applique, or blanket, stitch), but my machine doesn't have a satin stitch and it wasn't doing the close zig zag really well.  On a small amount of applique, I could have used stabilizer and made it work... but with so much I went back to my normal stitch.  
Green Bay Packers Quilt
I did end up using a satin stitch and stabilizer for the threads on the middle football though.  The placement of the football was bugging me, I just didn't like it.  Dionne came over one afternoon while I was working on it and suggested adding the threads on that ball only.  She was soooo right!  Good call Dionne!

Since this was a surprise, I had to work in small pieces at a time whenever Daryl wasn't home.  The design wall was a big help in getting the different pieces put in the right spot.  I started with paper cutouts, pinned them in place to make sure I liked it, and it helped to make sure the size of each piece was right.  Good thing, the original letters I was going to use were too small.  Back to the drawing board....

I was planning to quilt around every piece of applique along with stitch in the ditch around the white field lines and inner border.  The ditch stitching went pretty well.  I then used a metallic gold embroidery thread to stitch just inside the stars.  I was getting so frustrated trying to fit this large of a blanket through my machine's 4" throat, I only ended up doing the larger stars and stopping.  It was that or the machine would have suffered.  Then I would end up suffering with no way to sew.  Got the binding attached and the blanket was ready for our anniversary weekend.
He nap tested the blanket yesterday and it passed.  Today he's keeping it close by as he spends this wonderful fall day watching football.

Happy Anniversary My Love!

Saturday, September 22, 2012

Merry Merry Snowman - Block 2

applique and hand embroidery
I'm about to pick up block 7 from Pacific Fabrics, and I just finished block 2.  Whew, this was a lot of work.  Many hours went into this one little block.  Putting the background together went fast - well, once I quit making cutting mistakes anyway.  :) 

Each block comes with just enough of the fabrics needed to make it.  For the upper light colored fleur-de-lis, I cut that piece a 1/2" too small on one side.  I went to the fabric store for a new piece of fabric, and cut that one with the fleur-de-lis' going the wrong direction!  Aye!  Instead of driving back to the store, I cut that piece in half and pieced it so they went the right way. 

The reindeer (ear, tail, antlers), bird, sleigh, snowmen, present, scarves, sign, purse, hats are all applique.  There were many evenings watching tv hand embroidering snowman arms, reins, purse strap, noses, eyes, and sign text.  For this block I learned how to do a slip stitch and chain stitch.  Thank goodness for YouTube video tutorials!

Now, on to block 3....................

Wednesday, September 5, 2012

A Day at the Beach - Quilt #8

comfy couch quilt representing a fun day at the beachI work in a local school district, and one student that I worked with a lot graduated this past June.  A few of us in the office sew and quilt, so we'd always bring in our completed projects to show each other.  The day I brought in my beach blanket she saw it and asked if I would make her a blanket for graduation.  She requested a beach theme, but something more tropical.

Fortunately she is patient, and understanding.  I wasn't able to get the blanket done on time, but I promised I would have it to her as soon as possible.  Since my husband went out of town for Labor Day weekend, I had plenty of time to play in my sewing room.  I finished it in a few days.  I'm so glad to be able to to give her this blanket in honor of her graduating high school.

close up of a blockI had a pattern in mind when I started this project, but due to the size of the blocks in the beach themed panels I knew I would have to make modifications.  In addition, I try to pre-wash my fabrics before starting a project, and I did with these.  What I didn't realize at the time, is that washing panels is bad.  They come out all skewed.  So I had to further modify my plans.  Ultimately, I made it up as I went along, keeping the original pattern in mind for inspiration.  The finished blocks ended up 13.5" x 13.5".  There are nine of them with a border at the top and bottom.  Since the blanket would be far too busy with those blocks sewn directly together, I added a 1" border around each block.  Finished size of the blanket is approx. 44" x 60".

Some firsts for me:
Using directional fabric (top/bottom border) - seaming them together to make them long enough, and keeping it straight when attaching to the blanket.
Free motion quilting.  I just did one line of it to practice, I made a wavy line in the bottom border piece, to mimic water.

The end result is a very fun, colorful, tropical blanket that has everything representing a fun day at the beach.  I may want to make one for myself!  :)
close up of the bottom border

Thursday, August 23, 2012

Bunny for Baby - Quilt #6

baby quilt with applique bunny and flowerMy first commissioned quilt!  Ok, so the job came from my Mom, but it gave me good practice in turning someone else's vision into reality.  Fortunately she was very open to my thoughts and gave me a lot of creative freedom. 

Rayma recently had her first baby.  Her family and my family have been friends for so long, I call Rayma's mom auntie.  We all live in different states, and haven't seen each other in many years, but my mom is still very close with all of Rayma's family.  Mom wanted a special and unique gift that Rayma and Harper could treasure forever. 

The blanket measures approximately 30" x 40".  It includes applique, hand embroidery, and machine quilting.  This was my first time machine quilting anything other than stitch in the ditch.  My machine doesn't do it well, but I made it work.  :)

To make this quilt: baby blanket with applique flower and hand embroidered name
  • Cut six 10.5" x 10.5" squares, cut one 30.5" x 20.5" rectangle for the center.  Sew two strips of three squares each.  Attach one strip on either side of the rectangle.
  • Find a bunny and flower applique drawing (I like Google images), choose your fabrics then trace and applique.  Attach baby rick rack.
  • Use a button for the bunny nose and hand embroider the mouth and whiskers.  The eyes are a 6 strand french knot.  Hand embroider the baby name and birthdate onto the flower applique.  (I typed it on the computer to give me a font so I wouldn't have to rely on my handwriting, then traced it.)
  • Make your quilt sandwich, stitch around the bunny, stitch in the ditch on each of the squares at top and bottom.
  • Go to Google images and find different flower drawings. Print them on card stock, cut out and use as a template to draw the flowers (using disppearing ink) onto the blanket. Machine (or hand) quilt.
You will need:
3 fabrics for the top and bottom squares
1 fabric for the center rectangle
Fabrics for the bunny, flower and leaf
Fabrics for the backing and binding (I used the bunny fabric as backing and binding - it was perfect, and we had a lot of it)
Batting
Button
Matching DMC embroidery floss
Matching thread colors for quilting

The quilt top goes together pretty quick since it's six larger pieces.... everything else takes more time.  It was a labor of love and I really enjoyed watching this one come together!

~ Enjoy ~

Monday, August 20, 2012

F... CANCER - Quilt #7

fuck cancer quilt made for a friend with hodgkins lymphomaCancer sucks!  A friend was recently diagnosed with Hodgkins Lymphoma.  He's had lymph nodes removed, had his lungs drained of fluid a few times already, and is now going through chemo.  Hearing of his diagnosis really hit us hard.  Being thousands of miles away, there isn't much we can do for the family.  Even though it's very hot where he lives right now - everytime I see a picture of him in the hospital I think, 'he needs to have a custom blanket', because that is something I can do to let him, and his family, know that we are thinking of him.  So, the search for fabric began.

My husband (Daryl) even got interested in this blanket so we made it a collaborative project.  He made suggestions for fabrics and had veto rights for the stuff I picked out.  Our friend has participated in many Ironman races, both half and full.  His favorite part of the race is biking.  He loves watching sports, he's a chef and he loves his wine.  I scoured the internet and every quilt/fabric store I went into to find a bunch of fabrics I could use for a mash up quilt.

fuck cancer quilt with livestrong hand embroideryIn case my friend, or any of you out there reading, are wondering my thoughts behind the fabrics: here we go. In addition to the interests listed above, I found out his favorite colors are yellow and black because of Lance Armstrong's LIVESTRONG Cancer Charity.  Those fabrics (with LIVESTRONG hand embroidered on them) speak for themselves.  Since an Ironman consists of a bike race, swim race and running race I found fabrics representing each (there were slim pickin's though - thank goodness for the Summer Olympics the stores had sports fabrics in stock).  Then there's the food, chef and wine fabrics.  My favorite find was the print of chef's on bikes with wine and/or bread.  I wanted the blanket to be full of everything that my friend enjoys.  I wanted him to see something new or have it look different everytime he uses it. 

fuck cancer quilt features fabrics representing what the recipient likes
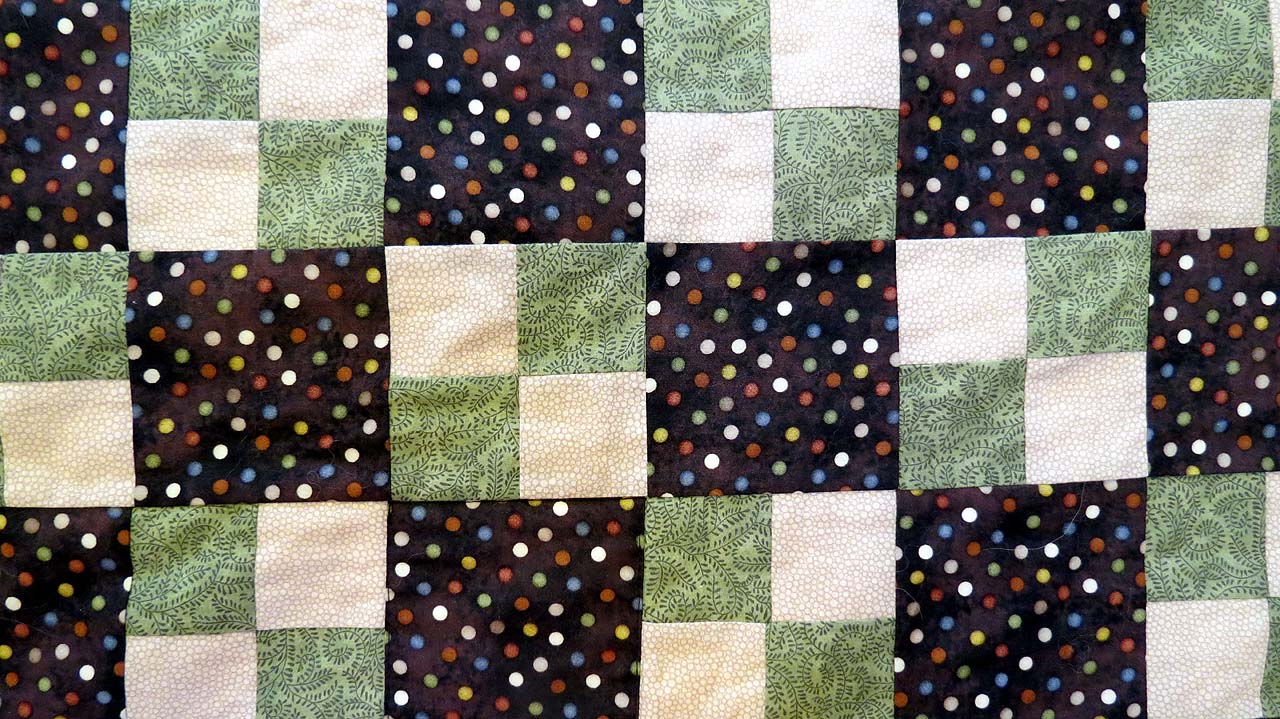
Once all the fabrics were picked out, I brought my friend Dionne into the collaboration.  I needed something that would go together fairly quick because I didn't want it to be a month before I could send this off.  I shared with her Daryl's thoughts on how he wanted the fabrics to go together and we formulated a plan based on a scrappy quilt.  Scrappy quilts are generally small strips sewn together in order to reduce the size of our scrap fabric pile.  I wanted the blanket to be about the size of my couch snuggler, which is 42" x 60", and since we wanted to see enough of each fabric pattern, we decided on the finished strips at 4" x 9".  Since I was staggering each row I'd also need some 4" x 5" pieces to fill in on the ends. 

I found that doing hand embroidery in the car on a long trip really helped to pass the time.  When I got home, I also discovered my writing isn't very good when trying to stitch in a moving vehicle.  In addition to the LIVESTRONG hand embroidery, I added 140.6 in a few places - which is the number of miles in a full Ironman race.  There's one little secret message to cancer inconspicuosly stitched into the blanket.  Since it contains a bad word (hint: look at the title of this post) I won't repeat it here.  I wonder when my friend will find it.  :)

I heard from a friend who's mother had Hodgkins Lymphoma that she was always cold and her skin was very sensitive from the chemo treatments.  So, keeping that in mind I used a soft, cuddly flannel for the back.

To make this blanket:
Cut
(68)  4.5" x 9.5" strips
(7)    4.5" x 5" strips
Backing and batting: at least 46" x 66"  (You want a couple inches on all sides)
Stitch
(5) pieces into a strip 8 times
(4) pieces into a strip 7 times
the 4.5" x 5" pieces onto each end of the 4 piece strip so it's the same length as the 5 piece strip
All the rows together
Finishing
Create your quilt sandwich of quilt top, batting and backing.  Baste.  Stitch in the ditch following the quilting width instructions of the batting you are using
Bind

Get well soon Rob!  We love you!

~ Enjoy ~

p.s. - for anyone wondering about the post for quilt #6, you haven't missed it - I can't post that for another week or two.  I need to wait until the recipient has seen the blanket first.  But - it's a cute one, and I can't wait to share it with you!

Sunday, July 22, 2012

Wall Hanging #1

wall hanging with applique butterfly

Babies are so much fun - and they're even more fun when I get to make things for them!  A teacher friend I worked with last school year was blessed with a baby girl this summer so I made a wall hanging for them.  This measures approx. 20" x 20".  I had a great time with the fabrics; the squares in the upper right and lower left corner was a treasure I found at a local quilt shop in Snohomish. 


applique butterfly on a wall hanging
The center square fabric has glitter, what can I say, I'm easily distracted by shiny things.  Glitter will almost always catch my eye.  :)  What's more girlie than a butterfly?  I found the beautiful batik I used for the wings at a quilt shop in Port Townsend.  Isn't it perfect for this use?  I used a back stitch for the antennae and french knots for the eyes by hand embroidery, appliqued the cheeks, and finished with a cute button for the nose.

blind stitched binding on back of wall hanginghanging sleeve on wall hangingFor the backing I used some fabric in my pile and added a hanging sleeve.  This was my first time ever making a sleeve!  This was also my first time doing a blind stitch on my binding.  Thank goodness for YouTube so I could learn how to do it...

In all, this was a really enjoyable project and I can't wait to make more in the future! 

Wednesday, May 23, 2012

Quilt #5 - Allie's blanket

pink and green focused quilt for a girl

A friend of mine was having a baby girl and I wanted to make a blanket baby Allie could grow into.  With that in mind, when my friend Dionne and I went shopping we looked for girlie fabrics, not necessarily nursery patterns.  Also, I didn't know what colors my friend would be choosing for Allie's room so I went with a mix.  The back is done in a nice light green flannel.  Also on the back, I made hearts using two of the fabrics from the blanket and hand embroidered Allie's name and birthdate, then appliqued it on.  Since the blanket was finished before she was born I had to hand stitch the applique.  Unfortunately I didn't get a picture of the hearts.  Next time.  :)

border fabric used for a girl quilt
rail fence designinner border of rail fence quilt for a girl

Monday, May 14, 2012

Merry Merry Snowman - Block One

I know it's been awhile since I posted... I have been working on some sewing projects for a client, and I finished one blanket that I can't post yet because it hasn't been given to the recipient.  I will get back to quilting soon, my projects are piling up! 

In the meantime, I did join a quilt block of the month club.  Pacific Fabrics in Everett, WA is doing one that doesn't involve going to a class every month.  This quilt will be made up of 9 blocks and includes embroidery and applique.  This is my first time doing either.  Thanks (again) to my friend Judi who helped me through the first block. 

The snowman, hat, cupcake holder, table and sign are applique.  The words, sign string, arms, eyes, and nose are embroidered.  I used a padded satin stitch for the eyes and nose.  I used a basic backstitch for the lettering.  I learned how to do both from videos on the internet!  Now I'm anxious to get started on the second block, which I will post when I'm finished.  :)

Sunday, March 4, 2012

Comfy Couch Blanket - Quilt #3

Most quilt patterns are in sizes of lap/crib, twin, queen and king.  I want something in between.  Maybe I'm just being difficult and refuse to follow 'recipes' as written, but I love sitting under blankets on the couch.

The crib size is too small and twin too big.  This blanket measures 41" x 64", the perfect size for covering one person on the couch, two if you're snuggling.  :)  It has 72 four by four squares and three borders.  It's a basic Four Patch pattern, but I added some length and an extra border.

The colors in my house are based on a western theme.  Browns, beige, rust/deep red, and green.  The polka dot fabric is my focus and while it looks black in this picture it's actually brown.  I also needed a non-neutral color and there was dark blue in the dots, so I pulled that out in one of the borders.  (The blue border is brighter in the picture than it actually is.)

I'm using 7 fabrics + warm & natural batting:
  • Fabric A Dark - Focus (36 inner squares and outer border)
  • Fabric B Medium - Green leafy (36 four patch inner squares)
  • Fabric C Light - Beige (36 four patch inner squares)
  • Fabric D Dark - Rust (inner border 1)
  • Fabric E Medium - Blue (inner border 2)
  • Fabric F Dark - Green (binding)
  • Fabric G Light - Camel (flannel backing)
My first quilt I took my time and made sure everything was near perfect.  The second quilt I got a little over confident so there were a few mistakes on it.  I re-grouped, worked through my mistakes and learned a few new things along the way.  Quilt #3 came out really good!  My squares are on point, the inner design didn't stretch, and using flannel for the backing worked out better this time.

A note to the other quilters out there: washing, pressing and starching the fabrics before starting a project is the way to go!

Since four patch quilt patterns are pretty standard, I won't include all the cutting/piecing instructions - but if anyone wants them, let me know.  Border widths are - Inner border one: 3"; Inner border two: 1.5"; Outer border: 4.5".


Sunday, February 19, 2012

Beach Blanket - Quilt #2

I promised to write about the good and bad of my experiences.  This blanket has both, but I learned some new things and in the end I like the outcome quite a bit.  In this post I'll include my mistakes, accomplishments and the cutting/piecing directions.  This quilt is made up of 72 inside squares, 2 inner borders, an outer border and the binding.  It measures 47" x 50".

Good: I'm getting much better at lining up my pieces.  Almost all of the squares are on point!

Bad: This was supposed to be a four patch... but I got started cutting and stopped reading the directions.  Oh well, I moved forward and starting making it up as I went along.  That's the beauty of quilting - it's flexible and forgiving.

Bad: Originally I had 3 sets of squares.  The focus fabric, the browns (which I did use), and squares made of the 2 inner border fabrics.  I just couldn't find a placement where I liked that last set of squares so I put them in my scrap pile and made more of the browns.

Bad: Once the inside was built I found that the material had stretched in places so it didn't lay really smooth.  Not a deal breaker, but I knew it would be challenging to do the batting and backing.

Lesson: I don't usually pre-wash my materials, but I told Judi I was planning to use flannel as the backing and she said I would need to wash both the quilt top and the backing since they will shrink differently.  Something I didn't know at the time - if you wash a quilt top before it's put together with the batting and backing - the seams fray pretty bad, and even came apart in 2 places, so I had to repair it.  From now on, I will pre-wash my fabrics before I start cutting and piecing!

Lesson: When using a focus fabric that is single directional and is intended for both the inside design and a border - make sure you have enough fabric to keep that direction by cutting the pieces both length of grain and cross grain.  Fortunately, I did.  Or, piece your inner design in different directions so it doesn't matter which direction your border is going. 

Lesson: Starch your fabrics well before cutting.  This will eliminate having to press as often during the building process and the fabrics won't stretch as much.  My new process starts with washing the fabrics, then I steam press the fabrics.  Next I apply a good amount of starch to the whole thing, turn it over and press.  Repeat for the other side.


Ok, now to the good stuff -
Materials list:
Up to 7 fabrics (I used 5)
36 - Seashell buttons
1 - DMC Perle #5 yarn

Cutting measurements are assuming 42" wide fabric and include a 1/4" seam allowance.
Fabric # Strips Width # yards
1 (part of square) 4 2.5" 3/8
2 (part of square) 4 2.5" 3/8
3 (focus fabric) 4 4.5" 5/8
4 (inner border 1) 4 3.5" 1/2
5 (inner border 2) 4 1.5" 1/4
6 (outer border) 5 * 4.5" 1
7 (binding) 5 2.5" 3/8
8 (batting) 1 50" x 53"
9 (backing) 1 50" x 53"
In my quilt, Fabric 3, 6 and 7 are the same.
* Alternate cutting option if you are using single directional fabric and you want it oriented correctly (and you have enough fabric): 2 strips, 4.5" wide (going length of grain) and 2 strips 53" long (going cross grain).
  • Sew Fabric 1 and 2 strips together to make four 4.5" strips.
  • Cut strips into 4.5" squares - you need 36 of them.
  • Cut Fabric 3 strips into 4.5" squares - you need 36 of them.
  • Lay out squares as shown (or arrange squares however you like) and sew them together by rows.
  • Sew the rows together.
  • You now have the inside built.
  • Attach Fabric 4 left/right sides first, then trim and do the top/bottom pieces.
  • Attach Fabric 5 the same as 4.
  • Sew together Fabric 6 pieces for the left/right sides so they are long enough (skip this step if you are using the alternate cutting option).
  • Attach Fabric 6 top/bottom sides first, then trim and do the left/right sides.
  • Your quilt top is now finished!
  • Cut your batting and backing, you want it larger than the top.
  • Attach quilt top to the batting.  Smooth it starting from the middle and work your way out, pinning as you go.  When you've got it as smooth as possible, replace straight pins with safety pins (makes it easier for attaching buttons).
  • Using DMC Perle #5, hand sew buttons to quilt top and batting.
  • Attach top and batting to backing, smoothing the same as above.
  • Stitch in the ditch around a few squares in the middle, and around at least one of the inner borders.  (This ensures your backing stays put during washing and heavy use.)
  • Make your binding by stitching the strips together and pressing it in half. 
  • Attach to the front of the quilt, raw edges together.
  • Flip the folded edge over the raw edge and press (just makes it easier for hand sewing).
  • Use a slipstitch to attach the folded edge to the backing.
You're done!  Congratulations!


Friday, February 10, 2012

Gwen's blanket

I've been posting mostly recipes, so I'm due for something about sewing.  Since my current project is still a few days away from completion, I'll show my first baby quilt.  A friend in Arizona has a three year old and I've wanted to send her something for awhile... but it had to be meaningful.  Now that I've learned how to quilt, a little blanket seemed the perfect thing.  My friend (and mentor) Judi suggested a rail fence design to start off with.  My friend Dionne and I went shopping for materials and she's amazing at putting fabrics together.  Between the two of us we came up with some great ideas.  I was so excited to see it put together, I worked feverishly to get it done - even through power outages!  (My husband hooked up a deep cycle battery and power inverter.)

Little Gwen's room is done in fuschia, brown, dark aqua and dark lime green.  The picture just doesn't do this quilt justice - it is so much cuter in person - the colors aren't quite right in the photo either.  The pink border has little polka dots, the inner dark color is actually brown, even though it looks black from here.  Click the pictures to see them larger...


Sunday, February 5, 2012

Valentine Table Runners

Sew Square
Sewing for me started a few years ago when a friend of mine introduced me to it while I was helping her make aprons.  She taught me the basics of cutting patterns, piecing fabrics together, etc and it wasn't long before I was hooked and wanted in on the action.  I bought myself a Brother machine from Costco.  I was looking for something simple and inexpensive to start with.  Then I started a new job and shortly after a new world of sewing opened up to me from the gals at work.  Quilting.  I'm in love. 

Sassy Strips
In 2010 my friend Judi wanted to get a few of us started so she suggested a Valentine's table runner using the flying geese pattern.  Dionne and I went to the fabric store during lunch to pick our fabrics.  I ended up with choices that were less Valentine and more to the style of my house.   

Since my first runner didn't end up being very 'Valentine', I decided to try again.  This time I bought fabrics specifically for the holiday.  I have 2 tables in view of each other, so I had to make 2 runners.  I like the idea of using the same fabrics but changing the pattern.  I think the runners turned out pretty striking, especially with the Batik.  The novelty print was my focus fabric when I was in the store, but the pink is the one that catches my eye now.  What do you think?

The Sew Square runner I made as directed ... and I didn't find this one easy.  In fact, while I was putting it together I started to doubt my choices and didn't like it very much.  When it was done though - I loved it.  For Sassy Strips I made 2 minor changes, just like cooking - I rarely stick with the 'recipe'.  The dark fabric was supposed to be 4 strips and the light 3... I reversed it because that Batik is so amazing and I wanted more of it.  I also added two panels to stretch it for the longer table.  Since there was a lot of pink on the Sassy Strips runner I used black binding, which ended up being a great choice.