Showing posts with label quilting. Show all posts

Friday, August 23, 2013

Continuous Binding

One of the things that really bug me with traditional binding (making a pocket for the ends) is that it's bulky where the ends meet up, and the binding strip is a little loose inside the pocket.  Every time I look at a project I can always easily spot the start/end of the binding.  A few months ago, I saw a tutorial for continuous binding (no pocket method) and wanted to try it.

I just finished a blanket (pictures coming soon) so I figured this would be a good time to go for broke.  I had been dragging my feet on doing the binding because I was a little nervous about messing this up.... but, to my surprise - it's EASY!!  It worked perfectly!!  I'm so excited and I don't think I'll ever go back to the pocket method again!

I can't find the video I originally saw/used, but this tutorial is really good and will get you started on continuous binding as well!

~ Enjoy ~

p.s. - those little tree quilts are ADORABLE!  I want to make some.  :)

Tuesday, April 30, 2013

Mug Rug #4: Beach Huts

At Christmas I considered making my sister's husband a mug rug to go with his bag of coffee.  She didn't think he would get much use out of it, but said she would love one for her desk.  I told her that one day I would send her a little surprise in the mail.  Well, today is that day.

I wanted to make her something that would remind her of the beach while at work so she could take a little mental vacation now and then.  This mug rug measures 7.5" x 9.5" and features 2 little beach huts (one for each of us), an umbrella, and a kite. 

Hope you like it Carrie!  Love you...

~ Enjoy ~

Sunday, April 28, 2013

Merry Merry Snowman Block 6

Merry Merry Snowman Block 6
I might be on a record here ... two M.M.S. blocks done in one month!  Three more blocks to go.  I think I could actually finish this by summer!  The very bottom strip I cut just slightly too small.  I'll have to make up my boo boo in the seam allowance when I piece the blocks together.  I really need to practice what I preach: measure twice, check directions twice, cut once.

There are embellishments that go on the snowman, the top present, and their hats after quilting is done.  Such fun.  :)

~ Enjoy ~

Friday, April 19, 2013

Merry Merry Snowman Block 5

Merry Merry Snowman Block 5


Finally finished block 5 of the Merry Merry Snowman quilt.  Four more to.  At this pace I might actually finish it before Christmas! 

I've decided there's a little more hand stitching than I enjoy doing ... but I'm loving all the applique designs.  This is a fun quilt and I look forward to seeing it all put together.

Tuesday, February 12, 2013

Forever Flowers - Wall Hanging #2

Flower pot wall hangingSome of you know that in December a co-worker of mine passed away.  It was sudden, shocking, and so very sad.  Brian was an amazing man, loved by so many people.  For his services they needed to use the high school gym and hundreds of people attended.  He was the office manager, and while at work he suffered a brain aneurism while talking with one of the secretaries.  She has sinced moved into his job and office.  I can't even begin to understand what a difficult decision it was for her.  I know when I walk down the hall I'm still adjusting from expecting to see his smiling face.  I wanted to do something for Tracy to help her personalize the space and celebrate her promotion. 

Close up of flowersWhen I stepped into the sewing room to start picking out a design and fabrics this isn't what I had in mind.  I didn't have any specific ideas, but it wasn't this.  I'm so happy with the end result and I hope she will be to.  I just love the creative process, even if I still don't fully understand it.  :)

Close up of vaseThe wall hanging measures 16" x 16".  It's a 12" x 12" muslin center, a 1" (finished) inner border with corner stones, and a 3" (finished) outer border.  The flowers and vase are appliqued on, I added a strip on the vase and attached heart button embellishments.  I embellished the flower petals with crayon to add some color and placed a swarovski crystal in the centers.

Flower embellishmentsFor the quilting I started off intending to do a cross hatch, but finished the first direction and liked it so much I stopped there.  When I attached the binding I added a strip of ribbon for hanging.  When I held it up, the small quilt would bow a little ... but once hung against a wall it laid flat and proper.  Daryl suggested I add a zip tie inside the binding just where the ribbon is to give it a little rigidity just to be sure it wouldn't go wonky at some point.  Worked like a charm!

 ~ Enjoy ~

Tuesday, January 1, 2013

Mug Rugs

I've been hearing a lot lately about mug rugs.  They are larger than a coaster to accomodate your beverage and a snack.  The other benefit is you get more design space.  :)  As a Christmas gift this year for a few friends and teachers I work with, I customized these to their likes.  They all vary in size depending on the design I went with.  I had a blast with a wonky cut batik, half dresden in batik, seahorses in batik, and Washington Huskies. 

The seahorses, WA Huskies, and half dresden were done with applique.  On the wonky cut I quilted in 2 flowers, one facing up and the other down so it's technically right side up no matter which way it's turned.  For the seahorses, I did a doodle all over quilting.  On the half dresden and WA Husky rugs I quilted by just tracing the object.

Batik Half Dresden Mug Rug
Batik Half Dresden Applique
WA Huskies Mug Rug
Washington Huskies Applique
Batik Seahorses Mug Rug with doodle quilting
Batik Seahorses w/doodle quilting
Batik Wonky Mug Rug with flower quilting
Batik Wonky w/flower quilting

Monday, December 31, 2012

"Curiosities" - Baby Charlie Quilt #11


Over the summer, I joined a few friends on a girls trip to the Olympic Peninsula.  We stopped at quilt shops and had lunch at Hurricane Ridge.  One of the shops we stopped at had an adorable panel called Curiosities made into a quilt and displayed.  My brother and sister in law were pregnant at the time and they were not finding out the sex.  I bought the panel hoping the little one would be a girl.  The shop owner let me take pictures of it to remind myself what it looked like.  

Lucky for me, they did have a girl!  I set to work right away on this quilt to have it ready in time for Christmas.  This was my first time using free motion quilting to trace.  I was pleased with the results! 

On the original blanket the baby name was done in hand embroidery, but I wanted it to stand out more so I appliqued her name using the border and binding fabrics.

Calla Lily Quilt #10

Calla Lily Quilt I made for my Mom at ChristmasHere's what I made my Mom for Christmas.  I tried to incorporate the colors of her house (purple/salmon/beige) plus her favorite color (blue) as well as her favorite thing (flowers) all into one blanket.  It measures out at 41 x 61. 

The calla lilies and vase are made mostly of various batik fabrics.  I appliqued using Wonder Under fusible webbing and a blanket stitch.  I used matching thread colors so the item would pop and not the stitching. 

The 'outside' of the flowers are a Kona solid that matched.  I had a scrap green batik that made perfect stems; it came in a bag of random fabrics a friend gave me.  Hard to see in the picture but it has a terrific blend of colors.  I don't have a lot of it left so I'm saving it in case I want to make more stems or leaves.  I'll have to keep my eyes open for another green similar to it.  The vase is a perfect purple batik and I used a solid purple Kona to simulate the 'inside' of the vase on that top edge.  I quilted a line across that bottom part of the vase to simulate a base to finish it off.

Calla Lily quilt for my mom at ChristmasI was browsing clip art images of flowers to get ideas and came across this image.  It was so perfect, I sized it and printed it then used that as my applique pattern.

I didn't follow a pattern; this is an original design.  I was inspired by a pattern I saw in a batik quilting book that was a wall hanging with big leaves over 2 panels.  The top design took on a few changes as I went along, and at one point I had the whole top put together then posted a picture on my favorite forum Quilting Board for advice on how to quilt it.  One of the members suggested I add a thinner black strip at the top and gave me a visual.  I agreed that it did look better so I took the top apart and added it. 

Custom quilting of calla lilies and leavesThis was my first time doing echoing, crosshatching and adding a specific free motion design. Because of this I used thread that matched the color of the fabric, so if I goofed it wouldn't show as much. In the panel next to the vase I did free motion calla lilies and leaves. I don't think I'll do this much quilting on a project this size with my machine again. It was very frustrating with a 4.5" throat. 

Calla lily pillow to match the blanketBack of the cally lily pillow I made a throw pillow out of the same fabrics with a smaller version of the calla lily to go with the blanket.  Since we were driving to Arizona for Christmas I could add this to her gift.  I finished the pillow leaving a hole in the bottom end, wrapped it, and packed a needle and matching thread.  The day after Christmas we bought the stuffing and finished it up completing the set.

Friday, November 9, 2012

Dresden Plate Pillow #1

Dresden Plate in 5 different reds and 5 differents tans and creamsRecently I joined a new forum, Quilting Board, after lurking around it for awhile.  There are so many great ideas from such talented people!  This is where I discovered the magnificent Dresden Plate.  The person made theirs as a table topper, and many people make quilts with Dresden Plates.

My friend's middle daughter recently moved into her own place so I wanted to make her a housewarming gift.  I decided a decorative pillow would be best.  Really nice ones are expensive, and can be hard to find in just the right colors.  I was having trouble deciding on a pattern for the pillow - until I saw the Dresden.  Right away I knew what I'd be doing.  I consulted my friend about what colors Aimee is decorating with, and went to work collecting fabrics.

This is so much fun, and using the Easy Dresden Tool it looks much harder than it is.  I'm now going to make Dresden pillows for myself and maybe even make a matching Dresden pillow with my quilts!  Maybe.

My first attempt at pillows a few years ago didn't go well, so I've been afraid to make them ever since.  The actual construction of the pillow, and closing it, went really well this time.  But ... I still learned a good lesson.  If using black fabric - line it!  The pillow fibers poke through and against the black fabric you can see every one of them.  A lint roller didn't pull them out, neither did duct tape!  I started pulling them out - one by one.  Then, a single piece turned into a few pieces, and as I kept pulling the wad of batting was getting larger, making it harder to pull out until I ended up with a hole. 

I took the Dresden Plate off the pillow and started over, this time lining the black with muslin.  Worked like a charm.  Since I had to piece the backing fabric from 3 strips, I ran a line of decorative stitching along each seam.  I put a thin strip of fusible interfacing behind the seams to give it some rigidity while doing the topstitching of the leaves.  I have a new quilting love/addiction..........
Click to enlarge image
~ Enjoy ~

Tuesday, October 2, 2012

Autumn Table Runners

Autumn table runners
Since I've learned to sew and quilt, I'm embracing decorating my tables for the seasons or holidays.  I didn't want to decorate for Halloween because making something general for fall made more sense.  Halloween stuff can stay out pretty much just in October, but if I made autumn themed runners they could be out from mid-September all the way through Thankgsiving!  I'm a more-bang-for-your-buck kinda girl.  :)

I'm also a glitter, sparkly and colorful kinda girl.  My friend Dionne and I went shopping a few months ago and found some beautiful fall fabrics.  So, here's how I used them!

Table runner using Quilt Bug free pattern
For this runner, on the bar table, I used a pattern from QuiltBug.com.  It's looks complicated, but it went together pretty quick!  I only changed it by adding 4 rows (two on each end).  The strips are not cut on the bias, but will be once you sew them diagonally.  For this reason, be careful how much you stretch the runner as you're making it.  For quilting I used stitch in the ditch on every other strip.  I love all three fabrics, but the glittery fall leaves is my favorite!

Gorgeous fall fabrics with glitter!


The next runner, for the dining table, I used Twiddle Tails' Strippy Runner pattern/tutorial.  This was fun and really easy.  For the first time since I started quilting, I cut strips without laboring over a ruler ensuring my cuts were exactly straight, and it was so nice!  My husband saw the runner top put together and was shocked I would make something like this since I'm so anal and haven't been known to do random, 'imperfect' projects.  I have been known to surprise him now and then.  Watch out world - Tina is learning to be crazy!  :)

When I started sewing the strips together, I was thinking I may not like the runner, then as I saw the bigger picture, I thought it was going to be difficult to get the 'quilt sandwich' layers to stay flat.  I was regretting going wonky, but then, it all worked out beautifully.  For quilting I used stitch in the ditch on every 3rd strip.  I look forward to making more of these!
Fall table runner using wonky cut strippy patternFall table runner with beautiful fabrics
 
~ Enjoy ~

Friday, September 7, 2012

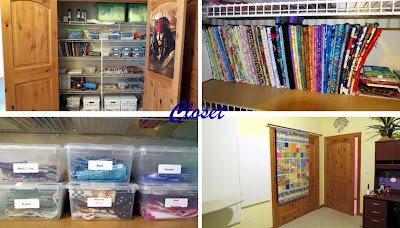
New sewing room

I used to have a home office.  Then I didn't need the home office anymore.  At that point, the piles started to grow.  If I didn't know what to do with something it went into that room.  I decided I needed a dedicated space to sew in... so I carved out a little area in that room for the machine.  The closet was full of junk so my fabric and materials ended up in bags on the floor.  This vicious cycle went on for more than a year, and the room continued to pile up.  When friends came over to sew, I moved all my stuff out to the dining table.  Any readers that have been to my house know that door was always closed.  You're about to see why.  I'm almost embarrased to show this photo, but I figure if I want to show the good, the room I'm proud of, then I also need to suck it up and show the bad, where I started.  So, here goes...........
 
Ok, so now you've seen this room at its worst.  For a long time I wanted to clean it up, do something with it, I just never knew what exactly I wanted or where to start.  The job seemed too big, too intimidating.  My mom is a great cleaner outter and decorater, so I thought I just needed to wait for her to come visit.  But then, when she's here I don't want to spend days working on a room. 
 
Recently, my husband and I sat down to have lunch and watched a PBS special about quilting.  Yes, I have a great husband that humors me on occasion.  On the show the host talked about a design wall, and that is what finally got me to tackle the room.  I started by researching design walls and how to make them.  Then I looked at hundreds of pictures and many blogs for sewing room ideas.  I wish I could give specific credit to the blogs where I got each of the wonderful ideas I incorporated into the room, but I visited so many great ones I lost track. 
 
I knew I couldn't hang a design wall until I cleared out and cleaned up.  That Monday I was on a mission.  For a week I didn't sleep well because I was so excited about the room, and ideas kept swarming in my head.  I wanted, I needed, to finish the room.  By the end of Day 1 most of the stuff on the desk, floor and closet had been sorted.  The hallway had 2 piles, one for donation and the other was boxes of old business files that needed to be shred.  The seat and floor of my car held office supplies that were to be dropped off at one of the schools where I'd worked.  The sewing stuff was all in the closet. 
Day 2, I finished working through the stuff; I'd sorted it all and put things that were staying in the closet.  I picked up paint samples and was about ready.  By the end of Day 2 the furniture was moved to the center of the room.  I never imagined, even at that time, I would end up loving the room as much as I do.  I had three color samples: a purple, light green and soft yellow.  I took a picture for mom and she liked the yellow best, my husband also liked the yellow.  It was at the bottom of my list.  But, trusting my advisors I went with the yellow. 
Day 3 I painted, and by the time my husband got home from work I was pulling the masking tape off and about ready to move furniture into place.  My mom and husband were absolutely right about the color.  Daryl made some great suggestions about furniture placement.  I certainly wouldn't have done as well.  I was so happy with the room at this stage.  It got so much better though.  Now the decorating work started.  I bought a curtain rod to go over the closet with clips so I could hang my projects for photos (idea from a blog).  I got a valance rod, found absolutely perfect fabric for the window, got coordinating fabric to recover the bulletin board on the desk, added under cabinet lights to the hutch, made the design wall (with help from Daryl and my friend Dionne), found some cool wall decorations, and last but not least made a pegboard (idea from a blog).
 
I found a really clever tip for organizing fabric from Maggie on the Smashed Peas and Carrots blog.  Right away I ordered the comic book storage boards so I'd be ready when the closet was empty.  I'd love to find a cabinet similar to hers for the fabrics, but for now they'll be hidden away in the closet.  My scrap fabrics are sorted and stored in containers by color.  I still have a little more organizing in the closet, and I will be replacing the furniture with different tables someday, but for now I have a whole new, pretty, organized sewing room for about $200.
sewing room with pegboard
design wall made from foam insulation wrapped in batting
sewing room with pegboard
organized sewing room closet with mini bolts
 
Yes, Captain Jack Sparrow stayed with the room re-design.  There was no way I could take him down.  Last, but certainly not least I have to say a HUGE thank you to my wonderful husband for all of his help in making this room happen.  His input and getting things hung for me was invaluable.  It was really special to me how excited he got at each stage in the process to see the changes take shape.  He took an active role in making my vision a reality, better than I thought it would be.
 
I've been so anxious to share this with all of you.  I hope you've enjoyed my ramblings and photos.  I'm happy to answer questions... and I'd love comments or suggestions.  Oh, and the table under the window is for guests (though my friend Dionne wants a nameplate someday), and I love to craft with friends!

Monday, August 20, 2012

F... CANCER - Quilt #7

fuck cancer quilt made for a friend with hodgkins lymphomaCancer sucks!  A friend was recently diagnosed with Hodgkins Lymphoma.  He's had lymph nodes removed, had his lungs drained of fluid a few times already, and is now going through chemo.  Hearing of his diagnosis really hit us hard.  Being thousands of miles away, there isn't much we can do for the family.  Even though it's very hot where he lives right now - everytime I see a picture of him in the hospital I think, 'he needs to have a custom blanket', because that is something I can do to let him, and his family, know that we are thinking of him.  So, the search for fabric began.

My husband (Daryl) even got interested in this blanket so we made it a collaborative project.  He made suggestions for fabrics and had veto rights for the stuff I picked out.  Our friend has participated in many Ironman races, both half and full.  His favorite part of the race is biking.  He loves watching sports, he's a chef and he loves his wine.  I scoured the internet and every quilt/fabric store I went into to find a bunch of fabrics I could use for a mash up quilt.

fuck cancer quilt with livestrong hand embroideryIn case my friend, or any of you out there reading, are wondering my thoughts behind the fabrics: here we go. In addition to the interests listed above, I found out his favorite colors are yellow and black because of Lance Armstrong's LIVESTRONG Cancer Charity.  Those fabrics (with LIVESTRONG hand embroidered on them) speak for themselves.  Since an Ironman consists of a bike race, swim race and running race I found fabrics representing each (there were slim pickin's though - thank goodness for the Summer Olympics the stores had sports fabrics in stock).  Then there's the food, chef and wine fabrics.  My favorite find was the print of chef's on bikes with wine and/or bread.  I wanted the blanket to be full of everything that my friend enjoys.  I wanted him to see something new or have it look different everytime he uses it. 

fuck cancer quilt features fabrics representing what the recipient likesOnce all the fabrics were picked out, I brought my friend Dionne into the collaboration.  I needed something that would go together fairly quick because I didn't want it to be a month before I could send this off.  I shared with her Daryl's thoughts on how he wanted the fabrics to go together and we formulated a plan based on a scrappy quilt.  Scrappy quilts are generally small strips sewn together in order to reduce the size of our scrap fabric pile.  I wanted the blanket to be about the size of my couch snuggler, which is 42" x 60", and since we wanted to see enough of each fabric pattern, we decided on the finished strips at 4" x 9".  Since I was staggering each row I'd also need some 4" x 5" pieces to fill in on the ends. 

I found that doing hand embroidery in the car on a long trip really helped to pass the time.  When I got home, I also discovered my writing isn't very good when trying to stitch in a moving vehicle.  In addition to the LIVESTRONG hand embroidery, I added 140.6 in a few places - which is the number of miles in a full Ironman race.  There's one little secret message to cancer inconspicuosly stitched into the blanket.  Since it contains a bad word (hint: look at the title of this post) I won't repeat it here.  I wonder when my friend will find it.  :)

I heard from a friend who's mother had Hodgkins Lymphoma that she was always cold and her skin was very sensitive from the chemo treatments.  So, keeping that in mind I used a soft, cuddly flannel for the back.

To make this blanket:
Cut
(68)  4.5" x 9.5" strips
(7)    4.5" x 5" strips
Backing and batting: at least 46" x 66"  (You want a couple inches on all sides)
Stitch
(5) pieces into a strip 8 times
(4) pieces into a strip 7 times
the 4.5" x 5" pieces onto each end of the 4 piece strip so it's the same length as the 5 piece strip
All the rows together
Finishing
Create your quilt sandwich of quilt top, batting and backing.  Baste.  Stitch in the ditch following the quilting width instructions of the batting you are using
Bind

Get well soon Rob!  We love you!

~ Enjoy ~

p.s. - for anyone wondering about the post for quilt #6, you haven't missed it - I can't post that for another week or two.  I need to wait until the recipient has seen the blanket first.  But - it's a cute one, and I can't wait to share it with you!

Monday, May 14, 2012

Merry Merry Snowman - Block One

I know it's been awhile since I posted... I have been working on some sewing projects for a client, and I finished one blanket that I can't post yet because it hasn't been given to the recipient.  I will get back to quilting soon, my projects are piling up! 

In the meantime, I did join a quilt block of the month club.  Pacific Fabrics in Everett, WA is doing one that doesn't involve going to a class every month.  This quilt will be made up of 9 blocks and includes embroidery and applique.  This is my first time doing either.  Thanks (again) to my friend Judi who helped me through the first block. 

The snowman, hat, cupcake holder, table and sign are applique.  The words, sign string, arms, eyes, and nose are embroidered.  I used a padded satin stitch for the eyes and nose.  I used a basic backstitch for the lettering.  I learned how to do both from videos on the internet!  Now I'm anxious to get started on the second block, which I will post when I'm finished.  :)

Sunday, March 4, 2012

Comfy Couch Blanket - Quilt #3

Most quilt patterns are in sizes of lap/crib, twin, queen and king.  I want something in between.  Maybe I'm just being difficult and refuse to follow 'recipes' as written, but I love sitting under blankets on the couch.

The crib size is too small and twin too big.  This blanket measures 41" x 64", the perfect size for covering one person on the couch, two if you're snuggling.  :)  It has 72 four by four squares and three borders.  It's a basic Four Patch pattern, but I added some length and an extra border.

The colors in my house are based on a western theme.  Browns, beige, rust/deep red, and green.  The polka dot fabric is my focus and while it looks black in this picture it's actually brown.  I also needed a non-neutral color and there was dark blue in the dots, so I pulled that out in one of the borders.  (The blue border is brighter in the picture than it actually is.)

I'm using 7 fabrics + warm & natural batting:
  • Fabric A Dark - Focus (36 inner squares and outer border)
  • Fabric B Medium - Green leafy (36 four patch inner squares)
  • Fabric C Light - Beige (36 four patch inner squares)
  • Fabric D Dark - Rust (inner border 1)
  • Fabric E Medium - Blue (inner border 2)
  • Fabric F Dark - Green (binding)
  • Fabric G Light - Camel (flannel backing)
My first quilt I took my time and made sure everything was near perfect.  The second quilt I got a little over confident so there were a few mistakes on it.  I re-grouped, worked through my mistakes and learned a few new things along the way.  Quilt #3 came out really good!  My squares are on point, the inner design didn't stretch, and using flannel for the backing worked out better this time.

A note to the other quilters out there: washing, pressing and starching the fabrics before starting a project is the way to go!

Since four patch quilt patterns are pretty standard, I won't include all the cutting/piecing instructions - but if anyone wants them, let me know.  Border widths are - Inner border one: 3"; Inner border two: 1.5"; Outer border: 4.5".


Sunday, February 19, 2012

Beach Blanket - Quilt #2

I promised to write about the good and bad of my experiences.  This blanket has both, but I learned some new things and in the end I like the outcome quite a bit.  In this post I'll include my mistakes, accomplishments and the cutting/piecing directions.  This quilt is made up of 72 inside squares, 2 inner borders, an outer border and the binding.  It measures 47" x 50".

Good: I'm getting much better at lining up my pieces.  Almost all of the squares are on point!

Bad: This was supposed to be a four patch... but I got started cutting and stopped reading the directions.  Oh well, I moved forward and starting making it up as I went along.  That's the beauty of quilting - it's flexible and forgiving.

Bad: Originally I had 3 sets of squares.  The focus fabric, the browns (which I did use), and squares made of the 2 inner border fabrics.  I just couldn't find a placement where I liked that last set of squares so I put them in my scrap pile and made more of the browns.

Bad: Once the inside was built I found that the material had stretched in places so it didn't lay really smooth.  Not a deal breaker, but I knew it would be challenging to do the batting and backing.

Lesson: I don't usually pre-wash my materials, but I told Judi I was planning to use flannel as the backing and she said I would need to wash both the quilt top and the backing since they will shrink differently.  Something I didn't know at the time - if you wash a quilt top before it's put together with the batting and backing - the seams fray pretty bad, and even came apart in 2 places, so I had to repair it.  From now on, I will pre-wash my fabrics before I start cutting and piecing!

Lesson: When using a focus fabric that is single directional and is intended for both the inside design and a border - make sure you have enough fabric to keep that direction by cutting the pieces both length of grain and cross grain.  Fortunately, I did.  Or, piece your inner design in different directions so it doesn't matter which direction your border is going. 

Lesson: Starch your fabrics well before cutting.  This will eliminate having to press as often during the building process and the fabrics won't stretch as much.  My new process starts with washing the fabrics, then I steam press the fabrics.  Next I apply a good amount of starch to the whole thing, turn it over and press.  Repeat for the other side.


Ok, now to the good stuff -
Materials list:
Up to 7 fabrics (I used 5)
36 - Seashell buttons
1 - DMC Perle #5 yarn

Cutting measurements are assuming 42" wide fabric and include a 1/4" seam allowance.
Fabric # Strips Width # yards
1 (part of square) 4 2.5" 3/8
2 (part of square) 4 2.5" 3/8
3 (focus fabric) 4 4.5" 5/8
4 (inner border 1) 4 3.5" 1/2
5 (inner border 2) 4 1.5" 1/4
6 (outer border) 5 * 4.5" 1
7 (binding) 5 2.5" 3/8
8 (batting) 1 50" x 53"
9 (backing) 1 50" x 53"
In my quilt, Fabric 3, 6 and 7 are the same.
* Alternate cutting option if you are using single directional fabric and you want it oriented correctly (and you have enough fabric): 2 strips, 4.5" wide (going length of grain) and 2 strips 53" long (going cross grain).
  • Sew Fabric 1 and 2 strips together to make four 4.5" strips.
  • Cut strips into 4.5" squares - you need 36 of them.
  • Cut Fabric 3 strips into 4.5" squares - you need 36 of them.
  • Lay out squares as shown (or arrange squares however you like) and sew them together by rows.
  • Sew the rows together.
  • You now have the inside built.
  • Attach Fabric 4 left/right sides first, then trim and do the top/bottom pieces.
  • Attach Fabric 5 the same as 4.
  • Sew together Fabric 6 pieces for the left/right sides so they are long enough (skip this step if you are using the alternate cutting option).
  • Attach Fabric 6 top/bottom sides first, then trim and do the left/right sides.
  • Your quilt top is now finished!
  • Cut your batting and backing, you want it larger than the top.
  • Attach quilt top to the batting.  Smooth it starting from the middle and work your way out, pinning as you go.  When you've got it as smooth as possible, replace straight pins with safety pins (makes it easier for attaching buttons).
  • Using DMC Perle #5, hand sew buttons to quilt top and batting.
  • Attach top and batting to backing, smoothing the same as above.
  • Stitch in the ditch around a few squares in the middle, and around at least one of the inner borders.  (This ensures your backing stays put during washing and heavy use.)
  • Make your binding by stitching the strips together and pressing it in half. 
  • Attach to the front of the quilt, raw edges together.
  • Flip the folded edge over the raw edge and press (just makes it easier for hand sewing).
  • Use a slipstitch to attach the folded edge to the backing.
You're done!  Congratulations!


Friday, February 17, 2012

1st table runners

When my friend Judi suggested I try quilting, and I was a little intimidated I might add, she had me start with the flying geese pattern.  It's pretty simple, just putting together a bunch of triangles. You know me by now, I didn't follow the directions because I wanted it as diamonds.  I also added some length so it would hang over the intended table.  This one took me a year to finish; the bug hadn't quite bitten yet. 

A few months later Judi suggested I try another table runner and brought me some patterns.  Since I have another table in view of the first runner I thought it would be good to make something out of the same fabric, and I had plenty left over.  I can't quite tell you why, or what happened, but all of a sudden it hit me.  I LOVE quilting.  I couldn't get enough.  Maybe it's being at the store, surrounded by so many great fabrics with ideas popping.  Maybe it's the joy of giving something homemade, with so much time, thought and care put into the gift, to someone else.  It could be the girl time spent with friends sewing together.  Might be seeing the finished project come together and look amazing.  Maybe it's adding a cool, custom decoration and everytime you walk by being able to say 'I did that, and I love it!'  Whatever it is, I'm unstoppable now.  :)

For the "square times" runner I used a light/medium/dark combination instead of a light/dark as the instructions say to do.  I would have preferred to use the medium fabric on the inside squares and the dark for the outside and ending triangles, but I didn't have enough of it left, and I couldn't find it anymore. 

These are the runners I use when I don't have holiday ones to display.